

Table of Contents
This guide will help you to set up GA 4 and its actionable tips and tricks. Easily set up your GA 4 with simple steps 1). Open Google Analytics 2) Sign into Google 3) Create a property 4) Select web stream 5) Integrate Google Tag with your website.
Learn the detailed implementation in the below article, Also, know about Why Google analytics is the vital factor of your business.
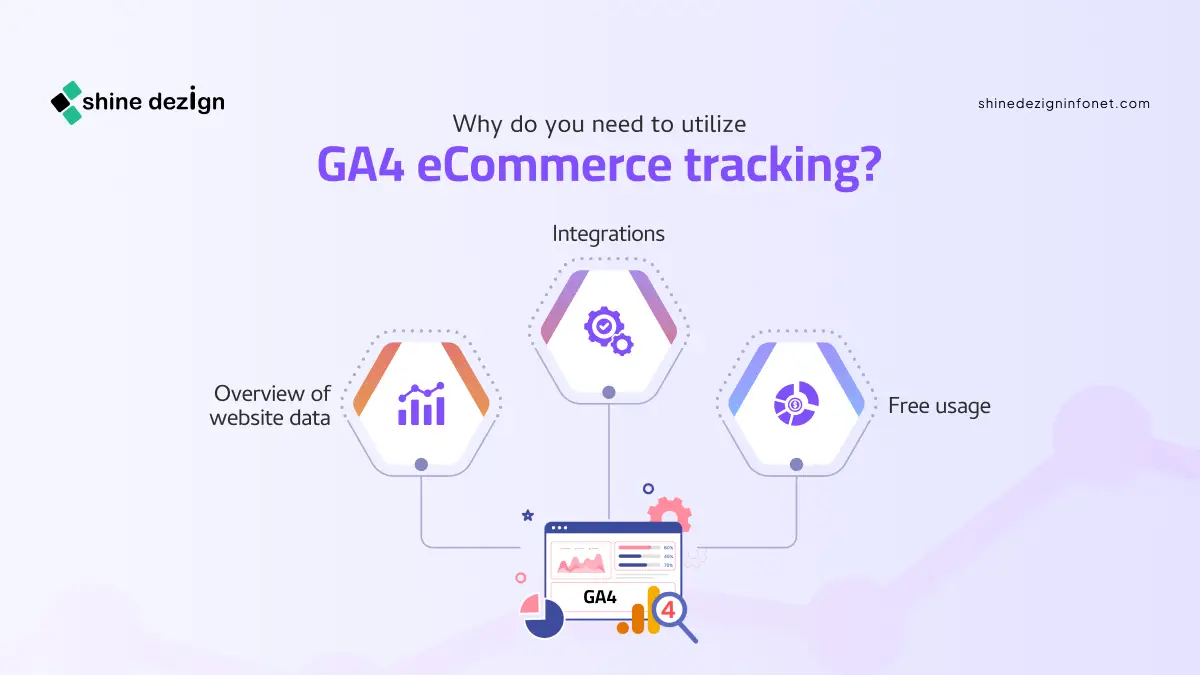
Why do you need to utilize GA4 eCommerce tracking?
 Google Analytics is the vital and user-friendly platform for most website owners for various reasons.
1. Overview of website data
Googe analytics gives your precise picture on website performance. It helps you to understand your top performing page or content, behavior of your target audience and ad campaign performance, and much more. Moreover, with easier tools you can immediately take action on low performing content.
2. Free usage
Another reason to utilize GA4 is for eCommerce tracking is its economical price. It gives you all the vital insights on your website performance at freemium subscription. All core features are unlocked for every users without needing them to spend.
Moreover, if you opt for the 360 version, you get higher data processing limits and a little advanced features like cross-property rolling up reporting and personalized funnel reporting.
3. Integrations
Apart from auto collecting events and delivering insights on your website. Google analytics can track personal events from external websites like Adroll, Pinterest, Quora and other forums site.
Moreover, it also has the ability to track transactions through mobile apps, including in-app purchases and app store refunds. It also integrated easily with third-party analytics and Business Intelligence (BI) platforms. This enables you centrally manage and review all the data.
Types of eCommerce tracking in Google Analytics 4
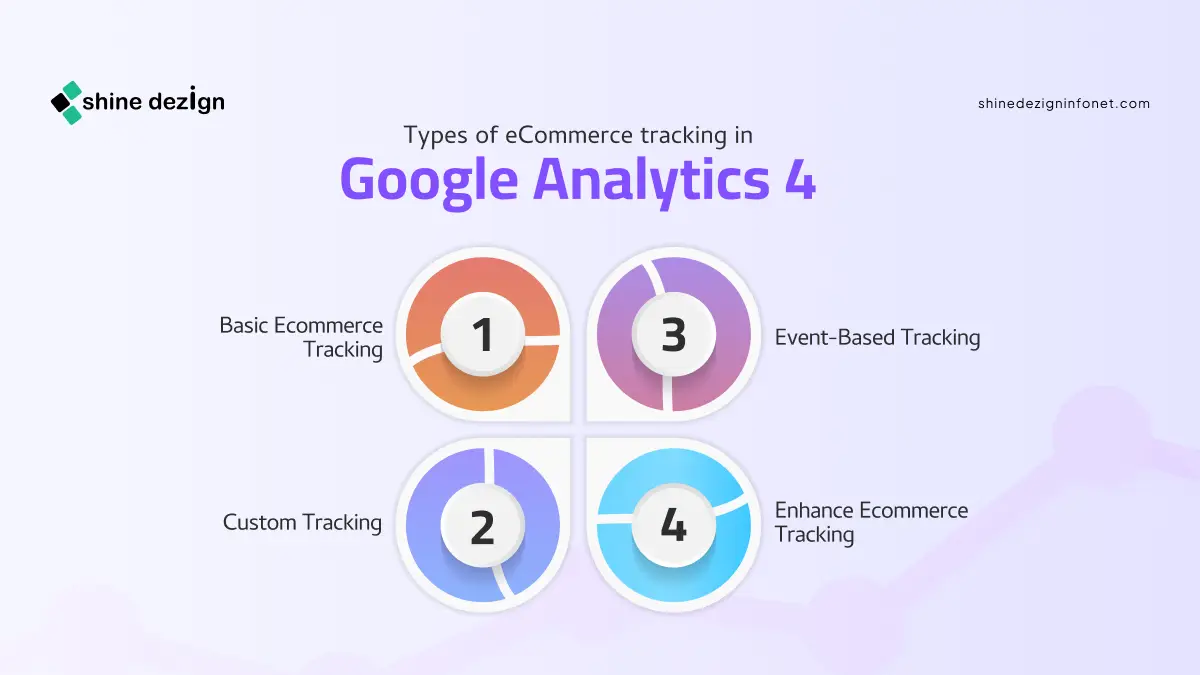 Setting up google analytics eCommerce tracking in GA4 includes the understanding of the different types of tracking made available to optimize your online store. Here are the key types of eCommerce tracking you can leverage in GA4:
Basic Ecommerce Tracking
This type of eCommerce tracking gives data on fundamental views like Product views and transactions. It helps you to understand the basic shopping behavior and performance of sales without requiring more customization.
Enhance Ecommerce Tracking
Enhanced eCommerce tracking provides a more detailed and comprehensive view by capturing detailed interactions. This incorporates product impressions, refunds, and checkout behaviors, allowing deep insights into the Shopping journey.
Event-Based Tracking
GA4 mainly focuses on event-based tracking. Events like ‘view-item’, ‘add-to-cart’ and ‘purchase ‘are custom-configured to particular user actions on your website. This type make sure critical eCommerce interactions are captured more accurately.
Custom Tracking
For businesses with requirements, custom dimensions and metric can be set up to track add on parameters. This might incorporate tracking usage of coupons, capturing engagement of users with custom event categories or product videos personalized to your business requirements.
By incorporating these diverse types of eCommerce tracking GA 4, you can gain more understanding of your online store’s performance and make it data-driven decisions to expand your eCommerce strategy.
Steps by Step Guide for setting up Ecommerce Tracking in Google Analytics
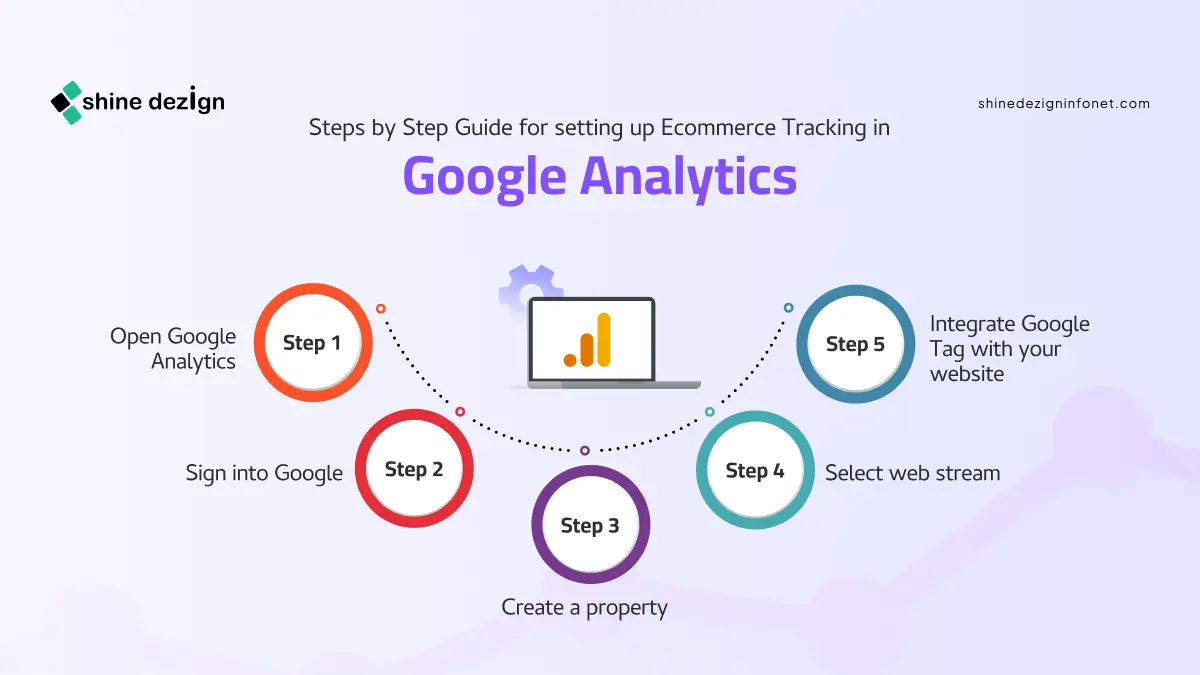
 Step 1: Open Google Analytics
Go to the Google Analytics website by navigating to – https://analytics.google.com.
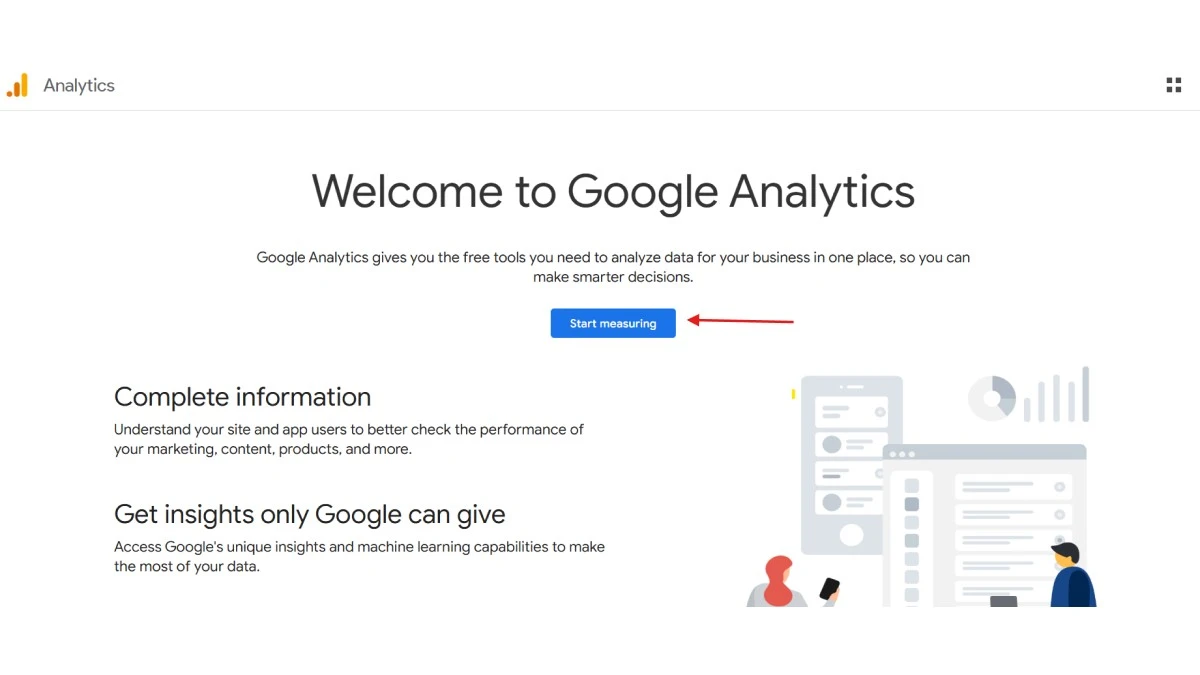
If you already have a Google account, sign in using your credentials. If you don’t have an account, you’ll need to create one.
Step 2) Sign into Google
Enter your Google account email and password to sign in.
If you have multiple Google accounts, ensure you’re using the one associated with your website or business.
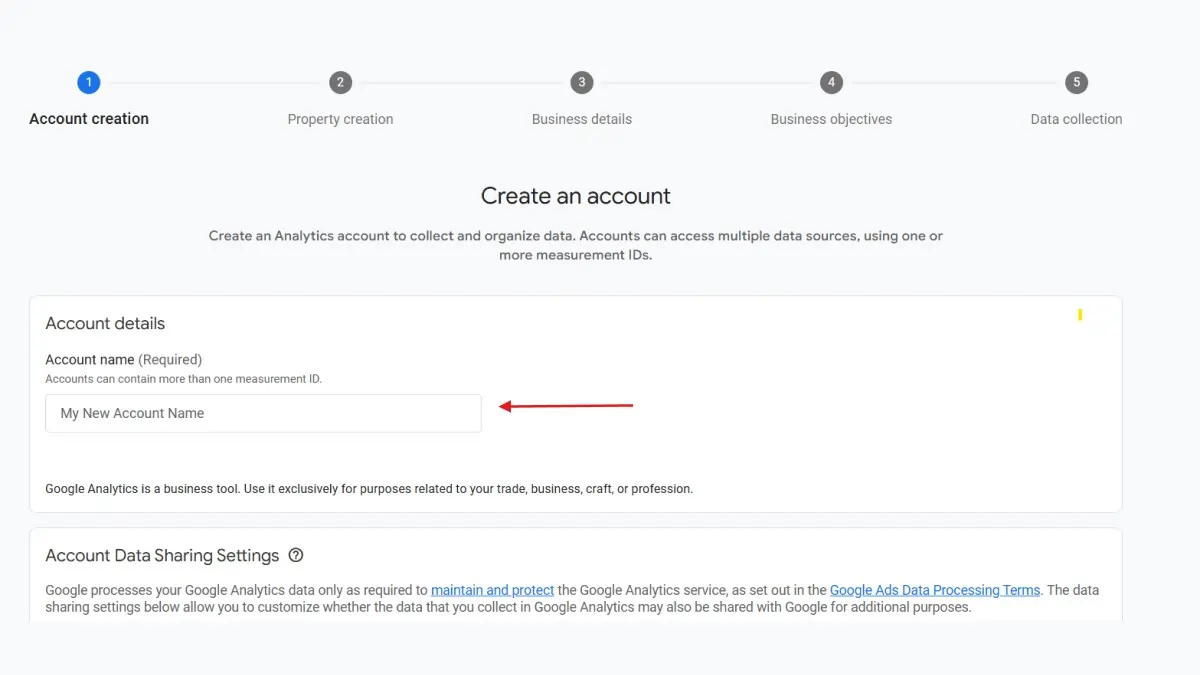
Step 3) Create a property
Once you’re signed in, you’ll be taken to the Google Analytics dashboard. If you don’t already have a property set up for your website, you’ll need to create one.
In the Account column, select the account where you want to create the property. If you don’t have an account, click Create Account and follow the prompts.
By incorporating these diverse types of eCommerce tracking GA 4, you can gain more understanding of your online store’s performance and make it data-driven decisions to expand your eCommerce strategy.
In the Property column, click Create Property.
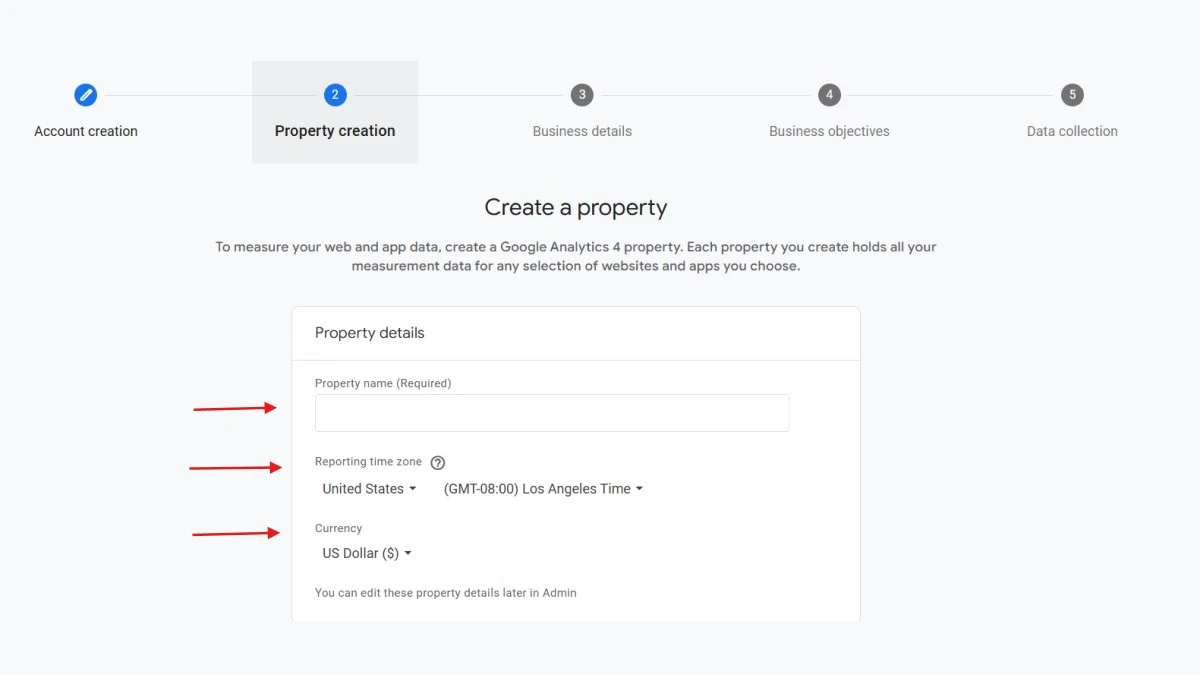
Fill in the required details:
a. Property name (e.g., “My Online Store”)
b. Reporting time zone
c. Currency
Click Next.
Step 4) Select web stream
1. After creating the property, you’ll be prompted to set up a data stream. Select Web as the platform.
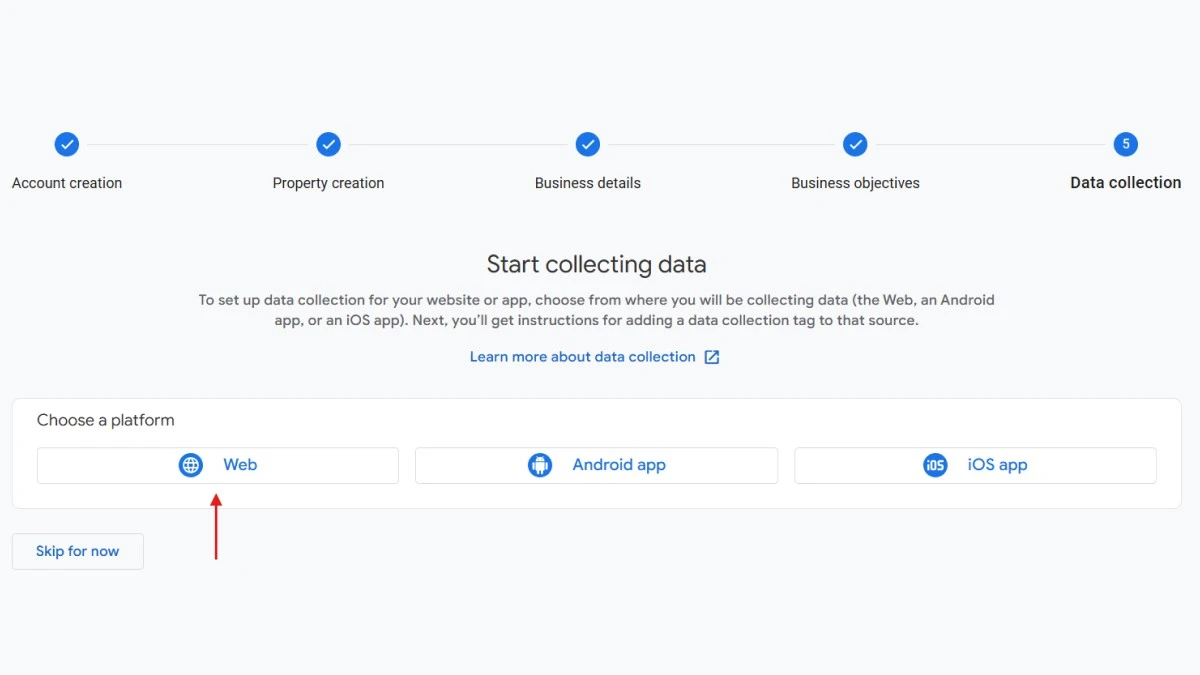
2. Enter your website URL and give your stream a name (e.g., “My Website”).
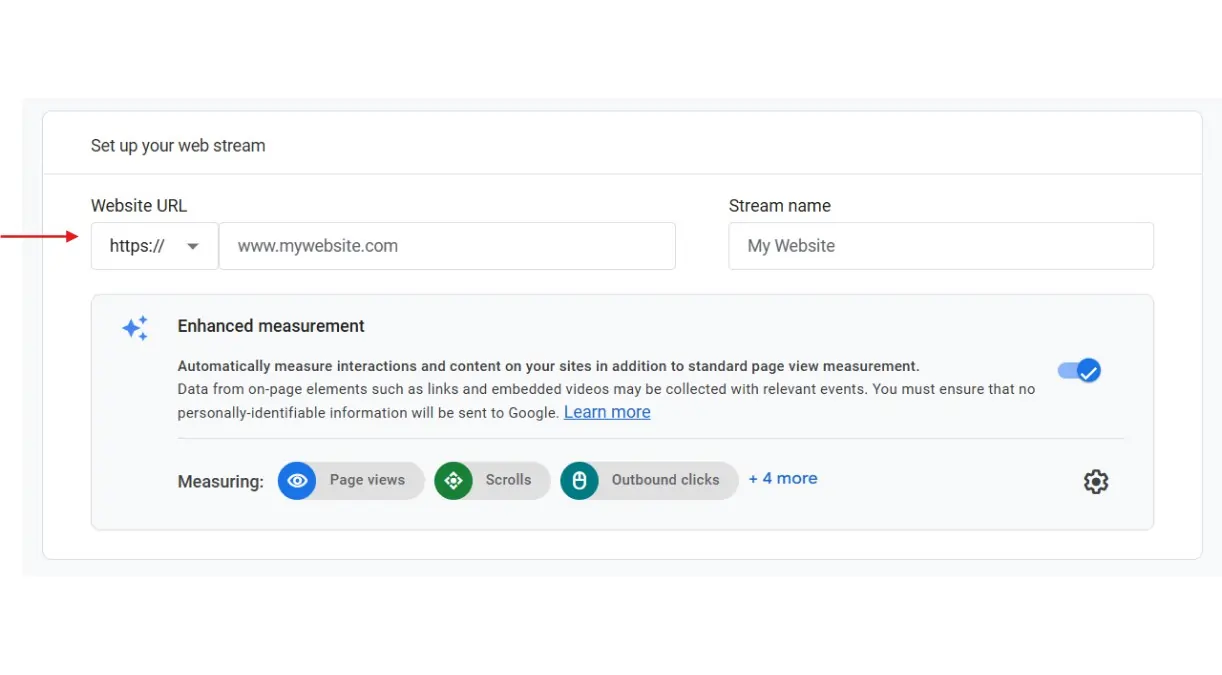
3. Click Create Stream.
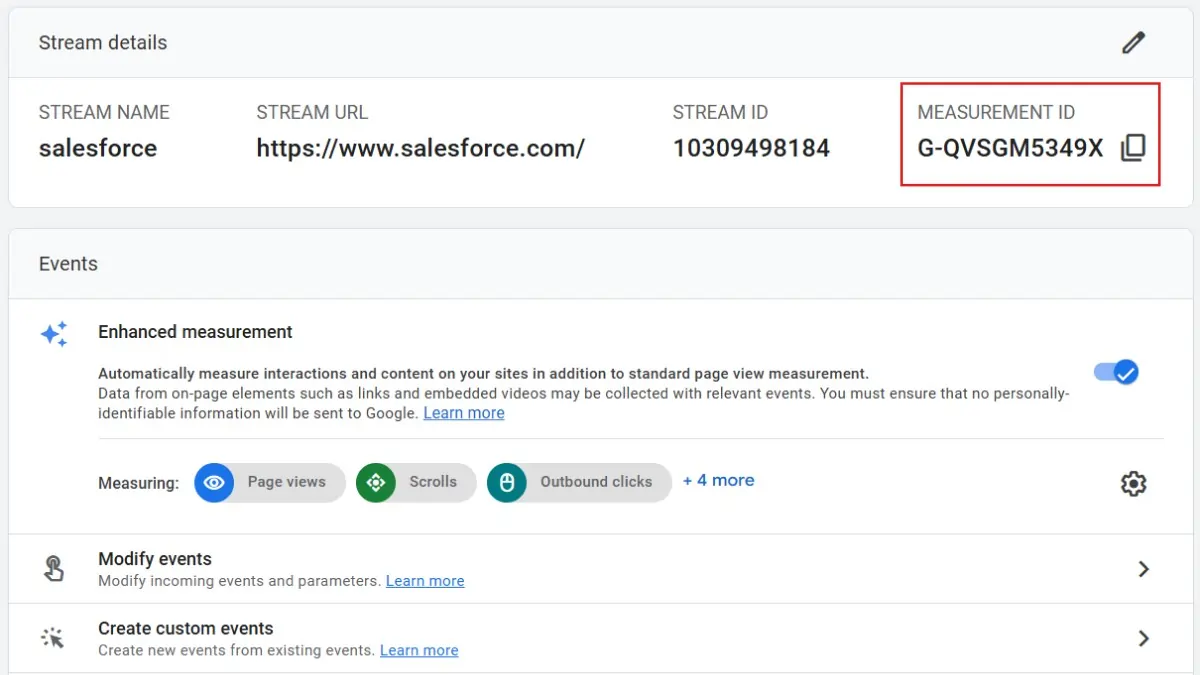
4. Once the stream is created, you’ll see a Measurement ID (e.g., G-XXXXXXXXXX). This ID will be used to integrate Google Analytics with your website.
Step 5) Integrate Google Tag with your website.
Go to https://tagmanager.google.com and sign in with your Google account.
1. Create a new container for your website (if you don’t already have one).
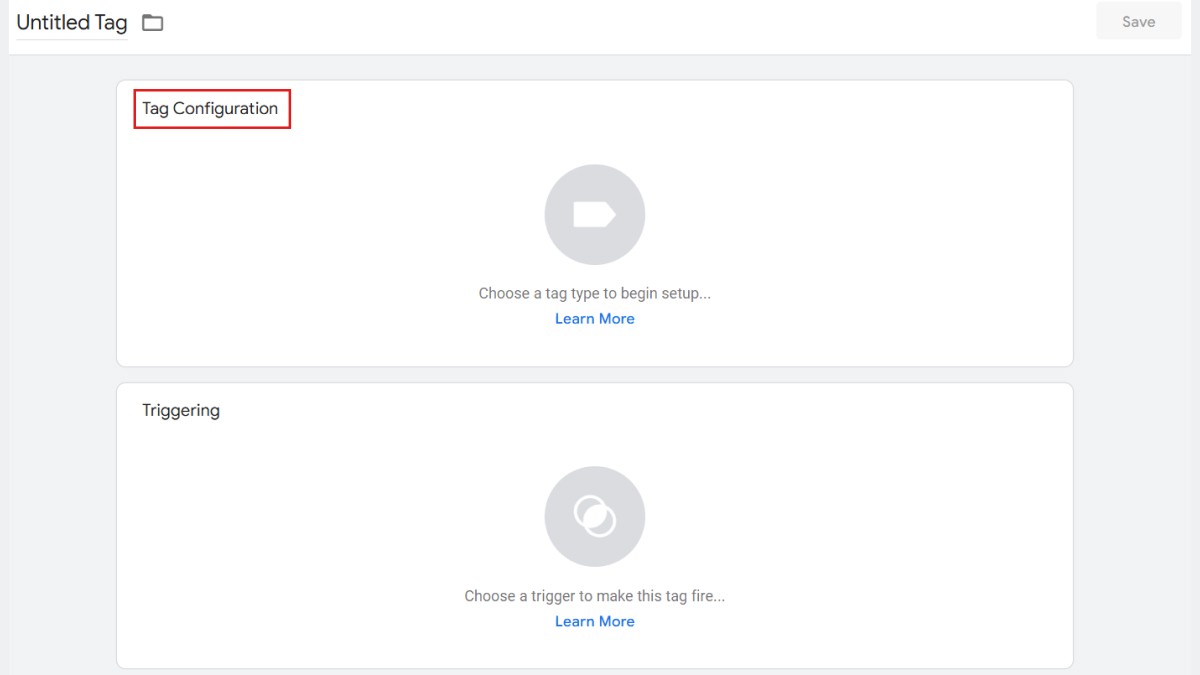
2. In Google Tag Manager, click Add a new tag.
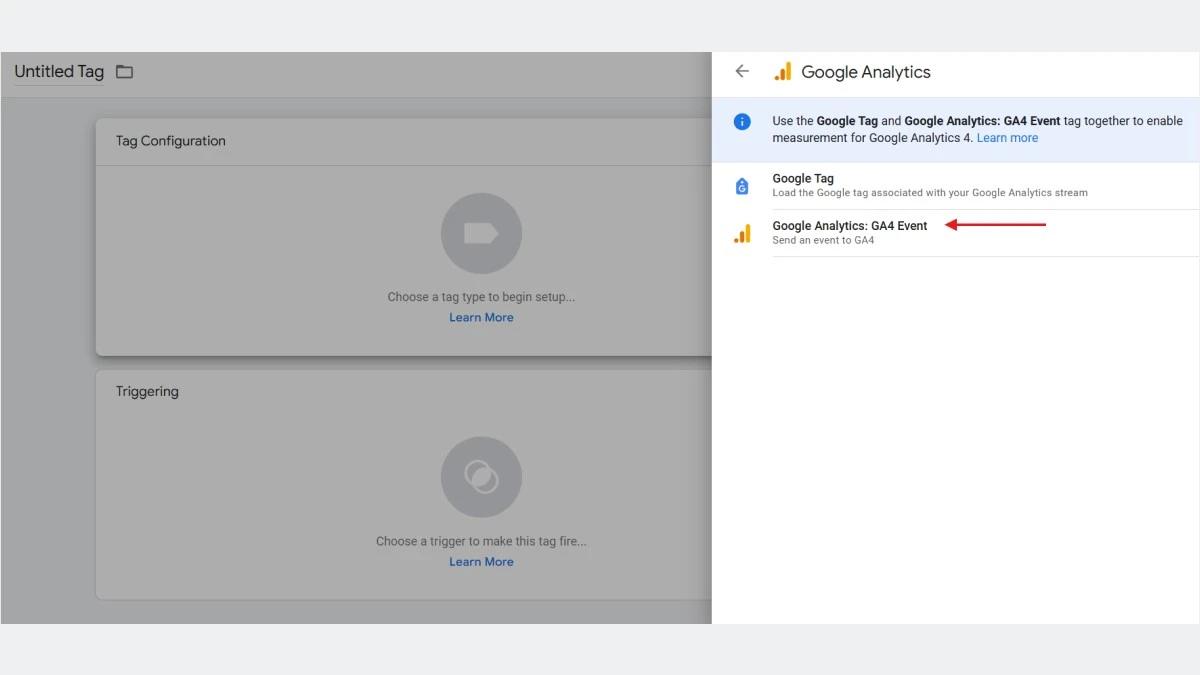
 3. Click on Tag Configuration and select Google Analytics: GA4 Configuration.
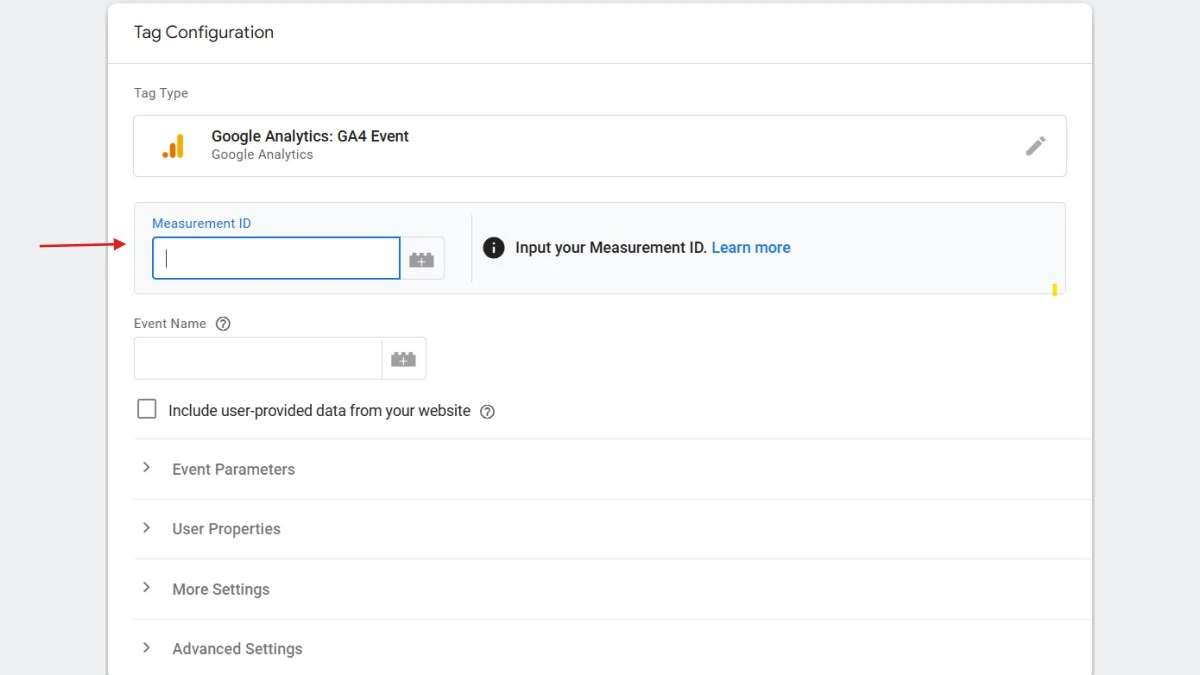
4. Enter your Measurement ID (from Step 4) in the provided field.
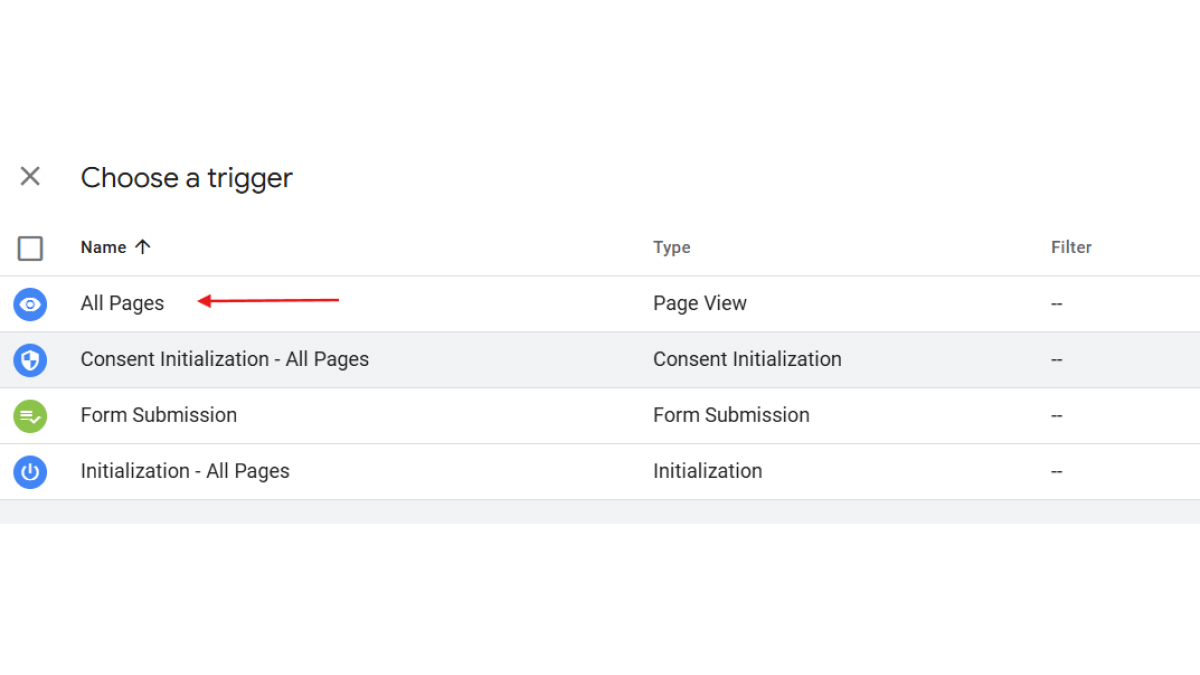
5. Click on Triggering and select All Pages to ensure the tag fires on every page of your website.
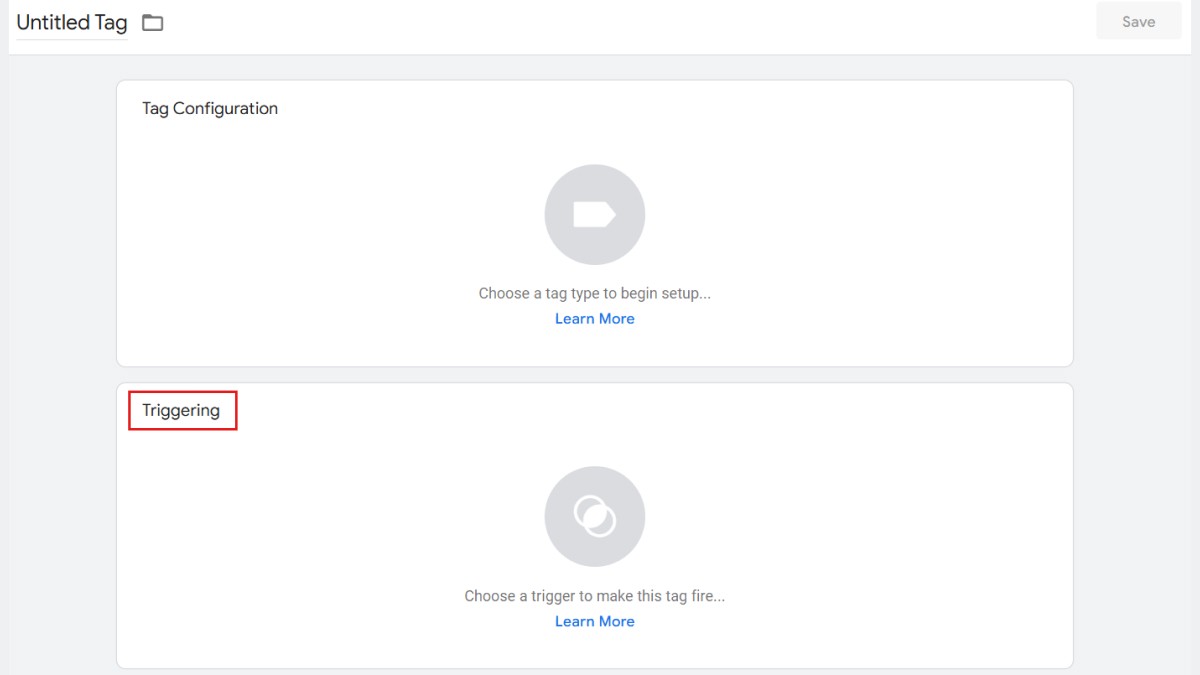
 Save the tag and publish the container.
Option 2: Manually Adding the Tag to Your Website
Copy the Google Tag code provided in the Web Stream Details section of Google Analytics.
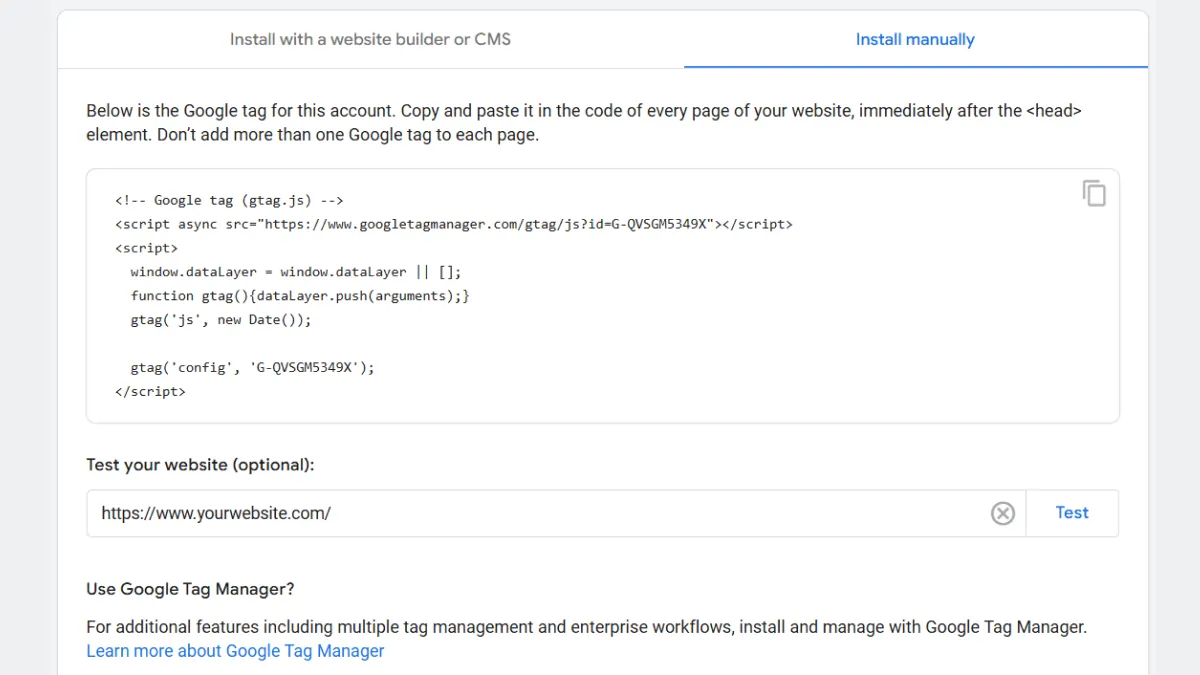 Paste the code into thesection of your website’s HTML code. If you’re using a CMS like WordPress, you can use a plugin like “Insert Headers and Footers” to add the code.
Mistakes to avoid when setting up Google Analytics for eCommerce store
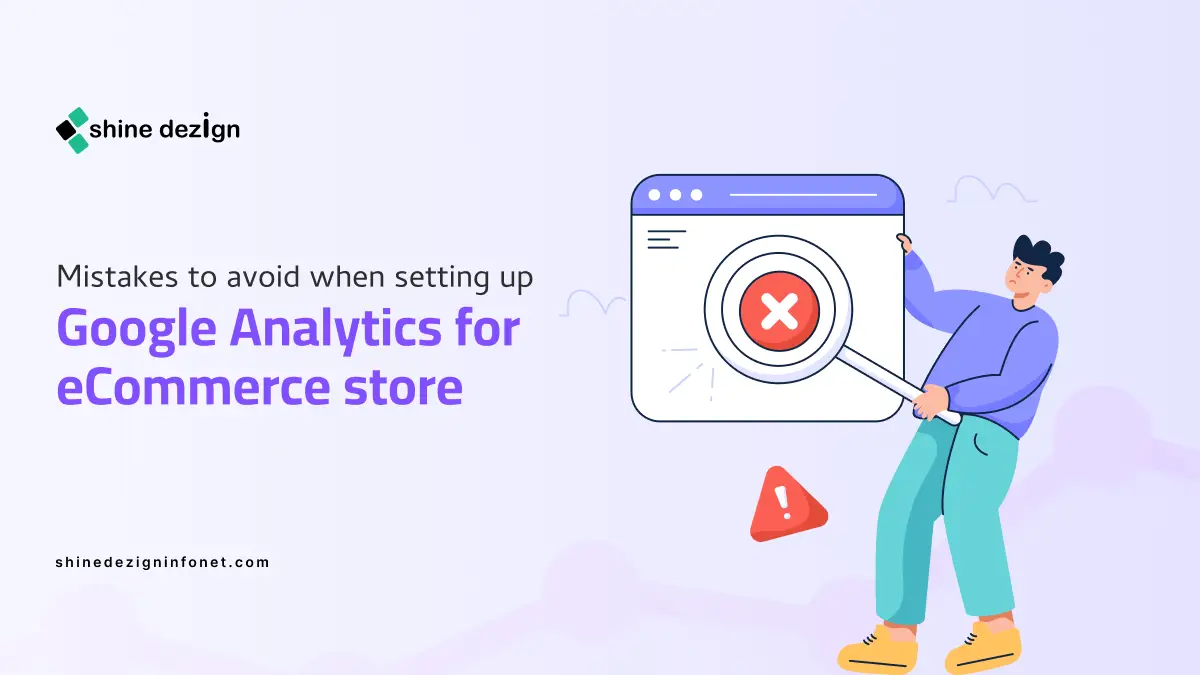 Setting up Google Analytics for an ecommerce store is essential for tracking sales, customer behavior, and overall store performance. However, even small mistakes during setup can lead to inaccurate data, missed opportunities, and poor decision-making.
Here are some common mistakes to avoid when setting up Google Analytics for your ecommerce store:
1. Not Enabling Ecommerce Tracking
One of the most critical mistakes is failing to enable ecommerce tracking in Google Analytics. Without this feature, you won’t be able to track key metrics like revenue, transactions, and product performance.
How to Avoid:
- Go to Admin > Ecommerce Settings and toggle on Enable Ecommerce and Enable Enhanced Ecommerce Reporting.
- Double-check that your ecommerce platform (e.g., Shopify, WooCommerce) is properly integrated with Google Analytics.
2. Incorrectly Setting Up the Google Tag
If the Google Tag (or Global Site Tag) is not implemented correctly, your website won’t send data to Google Analytics. This can result in missing or incomplete data.
How to Avoid:
- Use Google Tag Manager (GTM) for easier and more flexible tag management.
- Ensure the tag is placed in thesection of every page on your website.
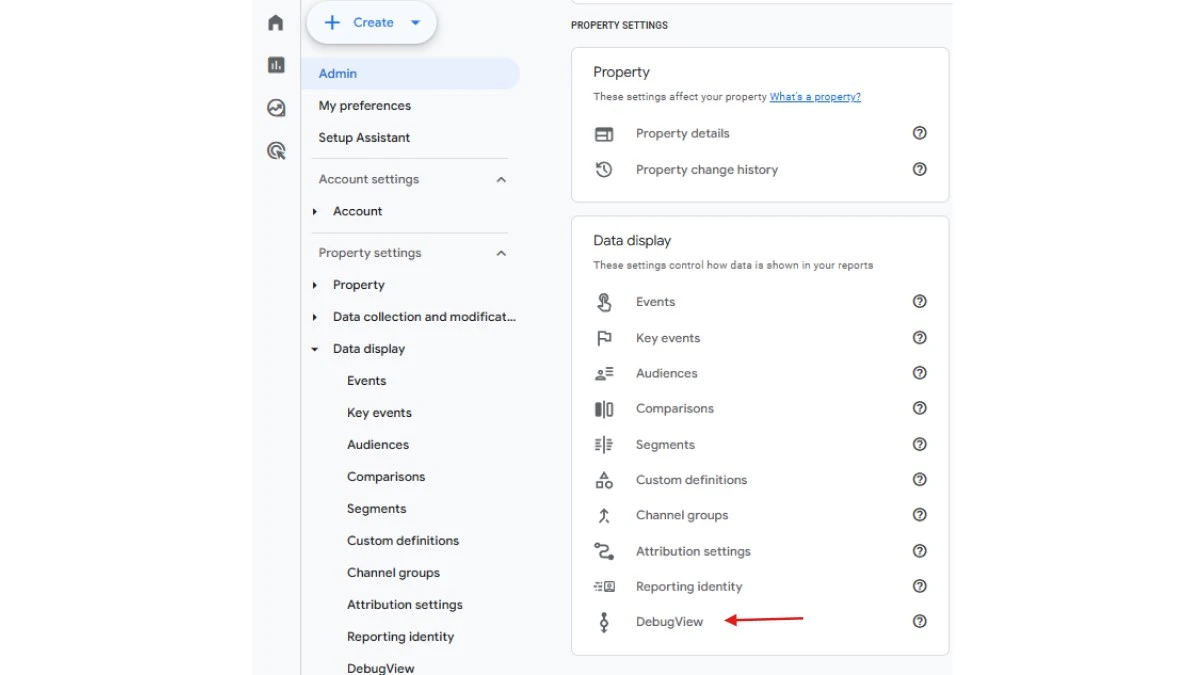
- Test the implementation using tools like Google Tag Assistant or the DebugView in Google Analytics.
3. Not Testing the Setup
Failing to test your Google Analytics setup can lead to undetected errors, such as missing transactions or incorrect data.
How to Avoid:
- Make a test purchase on your website and verify that the transaction appears in the Ecommerce Purchases report.
- Use Real-Time Reports to check if user interactions (e.g., pageviews, add-to-cart actions) are being tracked.
4. Ignoring Enhanced Ecommerce Features
Basic ecommerce tracking only provides limited data, such as transaction and revenue information. Enhanced Ecommerce offers deeper insights into customer behavior, including product impressions, add-to-cart actions, and checkout funnel performance.
How to Avoid:
- Enable Enhanced Ecommerce Reporting in Google Analytics.
- Ensure your ecommerce platform or developer implements the necessary code to track enhanced ecommerce events.
5. Not Filtering Internal Traffic
If you or your team frequently visit your website, this traffic can skew your data, making it difficult to analyze real customer behavior.
How to Avoid:
- Set up filters to exclude internal traffic. Go to Admin > Data Filters and create a filter to exclude traffic from your IP address.
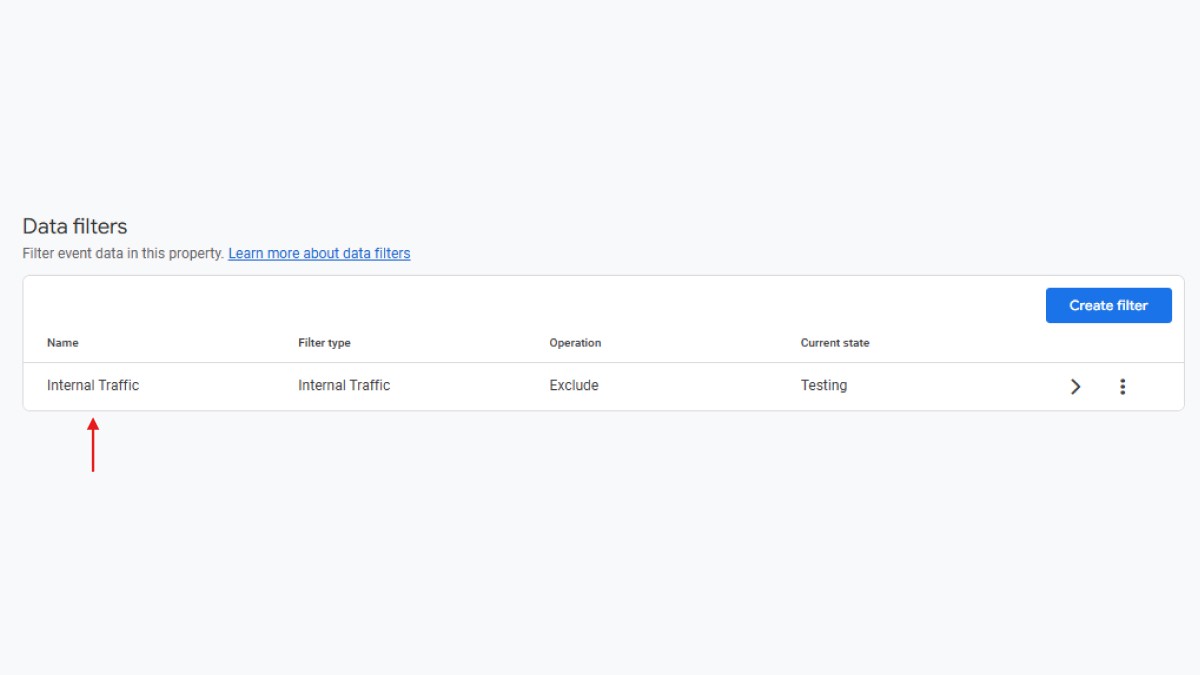
- Use Google Tag Manager to exclude internal traffic based on specific conditions.
6. Overlooking Cross-Domain Tracking
If your ecommerce store spans multiple domains (e.g., a separate checkout domain), failing to set up cross-domain tracking can result in broken user journeys and inaccurate session data.
How to Avoid:
- Configure cross-domain tracking in Google Tag Manager or directly in the Google Tag.
- Use the Referral Exclusion List in Google Analytics to ensure sessions are not broken when users move between domains.
7. Not Setting Up Goals and Conversions
Goals and conversions help you measure the success of specific actions, such as completing a purchase or signing up for a newsletter. Without them, you won’t be able to track important KPIs.
How to Avoid:
- Set up goals in Google Analytics under Admin > Goals.
- Track key actions like purchases, add-to-cart events, and newsletter sign-ups as conversions.
8. Ignoring Data Privacy and Compliance
Failing to comply with data privacy regulations (e.g., GDPR, CCPA) can lead to legal issues and loss of customer trust.
How to Avoid:
- Implement a cookie consent banner to inform users about tracking.
- Anonymize IP addresses in Google Analytics by enabling the IP Anonymization feature.
- Regularly review and update your privacy policy to ensure compliance.
9. Not Regularly Auditing Your Setup
Google Analytics setups can break over time due to changes in your website, platform updates, or incorrect configurations.
How to Avoid:
- Conduct regular audits of your Google Analytics setup to ensure everything is working correctly.
- Use tools like Google Analytics Audit Checklist or third-party tools like Screaming Frog to identify
Summing Up
By diligently following these steps, you’ll be able to track transactions, monitor product performance, and understand the customer journey from start to finish. This data-driven approach will empower you to refine your marketing strategies, improve user experience, and ultimately boost your online sales. Remember, eCommerce tracking is not a one-time setup but an ongoing process.
Regularly review your data, stay updated with Google Analytics features, and continuously optimize your tracking implementation to ensure you’re capturing the most accurate and actionable insights for your business.