


Table of Contents
To ensure significant growth, having the right tool to track your website growth is crucial. One such tool that is particularly suitable for monitoring your Shopify store is Google Tag Manager (GTM).
If you are handling a Shopify store, then Google Tag Manager can perfectly enhance your ability to manage & deploy marketing tags without the need for constant code changes. In this blog, we’ll walk you through what Google Tag Manager is, why it’s beneficial, and how to add Google Tag Manager to your Shopify store step-by-step.
What’s Google Tag Manager?
 Google Tag Manager (GTM) is a free tool that allows you to manage and deploy marketing tags (such as snippets of code or tracking pixels) on your website or mobile app without having to modify the code directly. It simplifies the process of adding and managing tags for various purposes or services, such as Google Analytics, Facebook Pixel, and more, all from a user-friendly interface.
With Google Tag Manager, you can:
Easily Manage Tags: Add, edit, or manage tags without needing a developer.
Track User Interaction: Set up event tracking to monitor user behavior on your site.
Improve Site Performance: Load the tag synchronously to improve site performance by reducing load time.
Version Control: Keep track of the changes & revert to the previous site if needed.
Google Tag Manager acts as a centralized hub for all your tracking needs, making it a significant tool for any e-commerce business.
Why Use Google Tag Manager on Your Shopify Store?

Integrating Google Tag Manager into your Shopify store has many benefits, like
Streamlined Tag Management:
With GTM, you can manage all your tracking codes in one place. This means you can add or update tags without needing to dive into the Shopify code. It saves your time and reduces the risk of errors.
Enhanced Tracking Capabilities:
GTM enables you to configure advanced features, including tracking button clicks, form submissions, and other user interactions. This data is crucial for understanding user behavior & optimizing your Shopify store’s marketing strategies.
Faster Page Load Times:
By loading tags asynchronously, Google Tag Manager (GTM) can enhance your site’s performance. This is mainly important for e-commerce stores or websites, where slow load times can often lead to reduced sales & cart abandonment.
Flexibility & Scalability:
With significant growth in your business, tracking needs also grow simultaneously. GTM makes it easy to add new tags & manage existing tags without any extensive coding knowledge.
Integration with Other Tools:
GTM seamlessly integrates with various marketing & analytics tools, allowing you to leverage the full power of your data.
How to Easily Add Google Tag Manager to Your Shopify Site?
 Here is a step-by-step guide on how to add Google Tag Manager to Shopify site using the manual installation & using an app method:
Method 1: Manual Installation
Step 1: Create a Google Tag Manager Account
1. Sign Up for Google Tag Manager:
→ Go to Google Tag Manager.
→ Click on “Start for free” & sign in with your Google account.
2. Create a New Account:
→ Enter your account name (usually your business name).
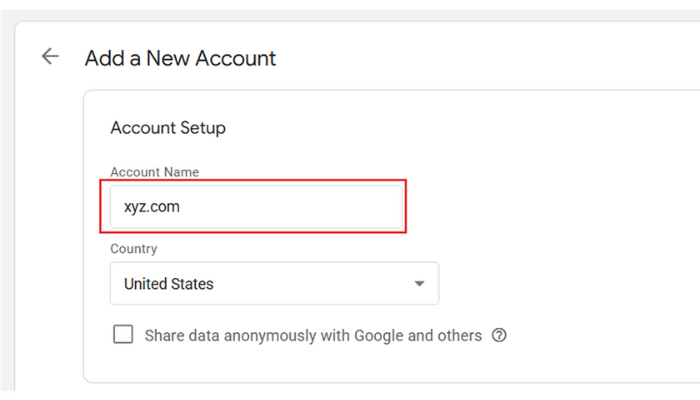
→ Select your country.
→ Enter a container name (typically your website name).
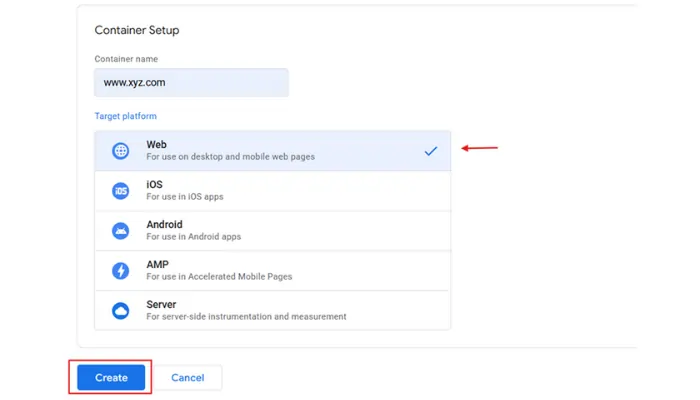
→ Choose “Web” as the target platform.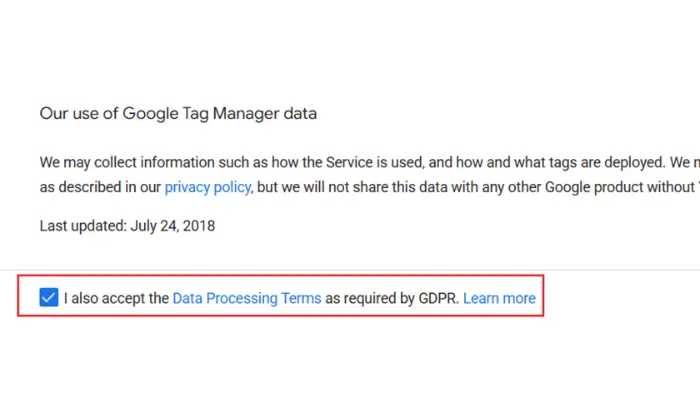
→ Click “Create” & accept the terms & services.
3. Get Your GTM Code:
→ After creating the account, you will see two snippets of code (One for the sections & the other for the section).
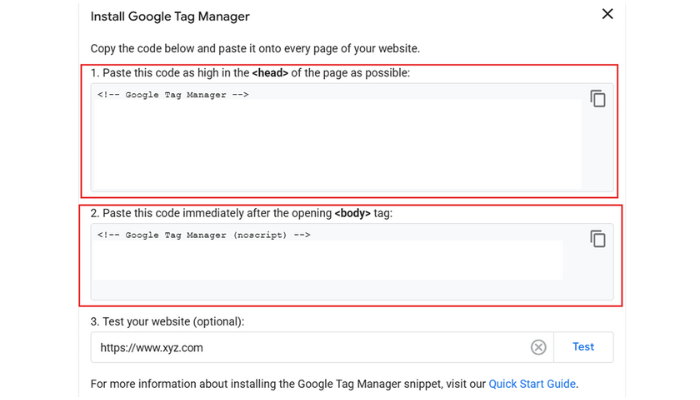
→ Copy both snippets for the next step.
Step 2: Access Your Shopify Admin
1. Log In to Shopify: Go to your Shopify admin panel by logging in to Shopify.
2. Navigate to Themes:
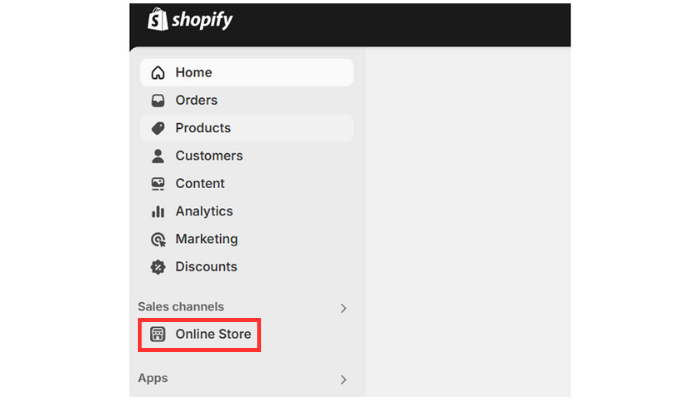
→ In the left side bar, click on “online store”.
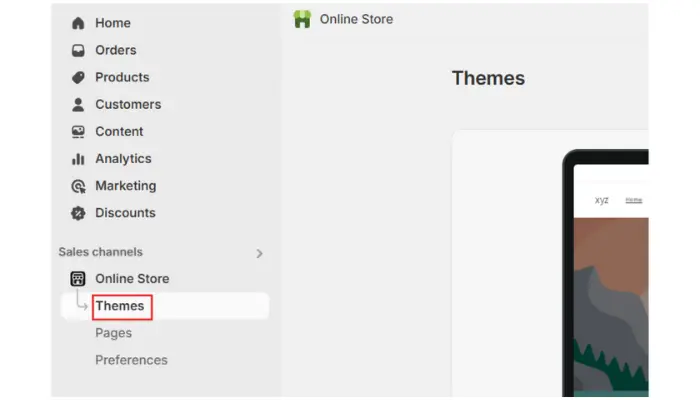
→ Under “themes”, you will see your current theme.
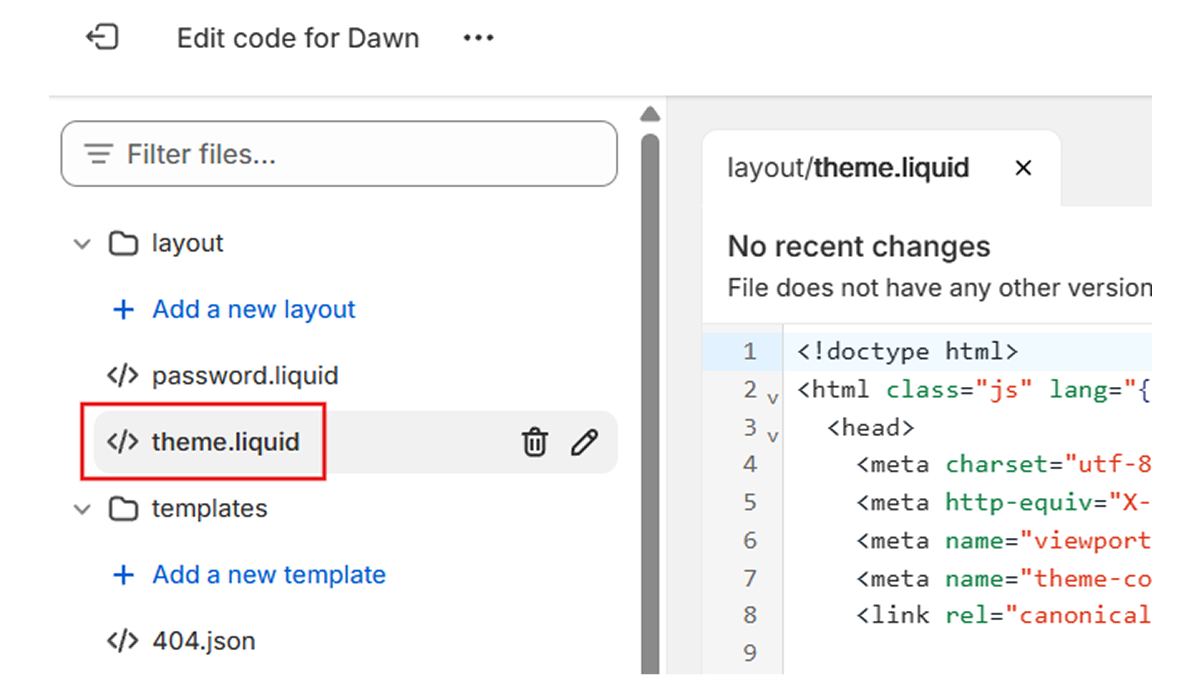
Step 3: Edit Your Theme Code
1. Edit Code:
→ Click on the “Actions” button next to your current theme.
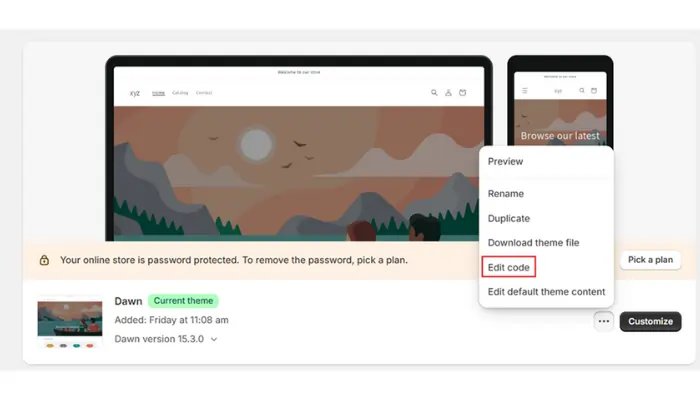
→ Select “Edit codes” from the dropdown menu.
2. Add GTM to the <head> Section:

- Look for the closing
</head>tag.
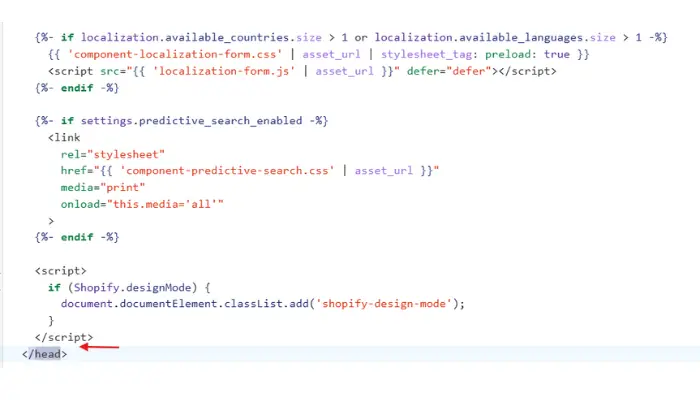
- Paste the first GTM code snippet before the closing
</head>tag.
<!-- Google Tag Manager -->
<script>(...your GTM code...)</script>
<!-- End Google Tag Manager -->
3. Add GTM Code to the <body> Section:
- Still in the
theme.liquidfile, look for the<body>tag.
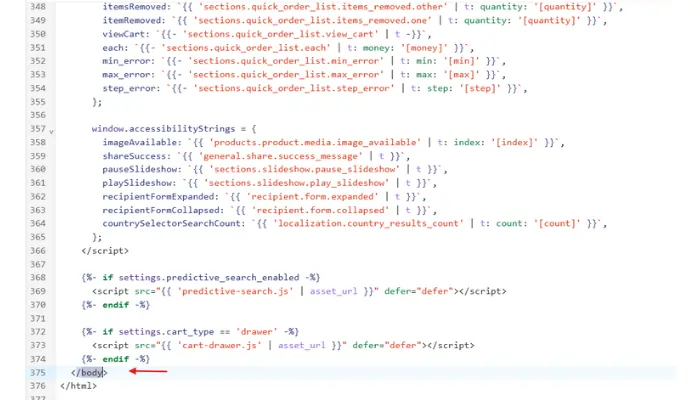
- Paste the second GTM code snippet immediately after opening the
<body>tag.
<!-- Google Tag Manager (noscript) -->
<noscript><iframe src="...your GTM code..." height="0" width="0" style="display:none;visibility:hidden"></iframe></noscript>
<!-- End Google Tag Manager (noscript) -->
4. Save Changes: Click the “Save” button in the top-right corner to apply your changes.
Step 4: Verify Your Installation
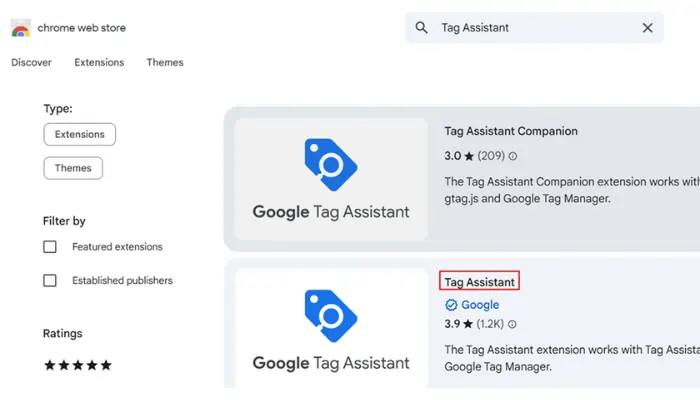
1. Use Google Tag Assistant:
→ Install the Google Tag Assistant browser extension.
→ Open your Shopify store in a new tab.
→ Click on the Tag Assistant Icon in the extension & enable it.
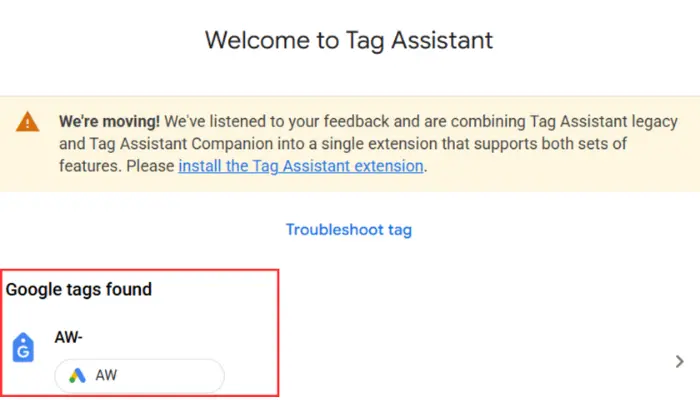
→ Refresh your store page & check if tags are firing correctly.
2. Preview Mode in Google Tag Manager:
→ Go back to your GTM account.
→ Click on the “Preview” button in the top right corner.
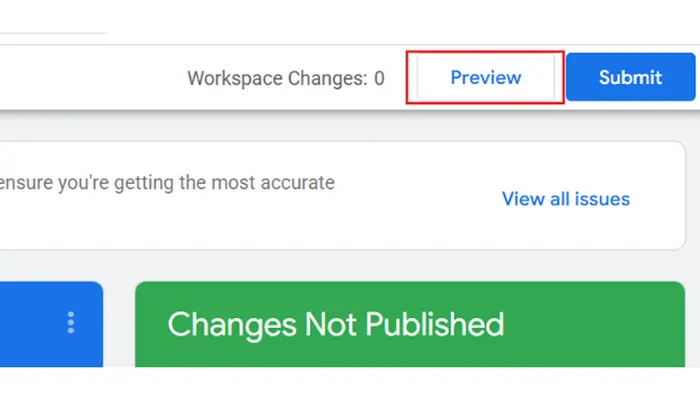
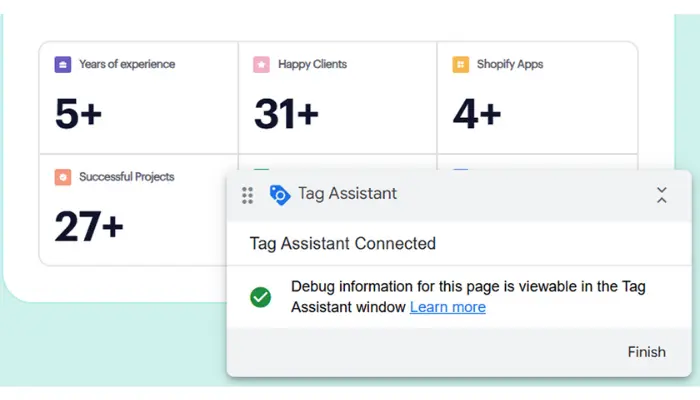
→ Enter your Shopify URL & click on “Connect”.
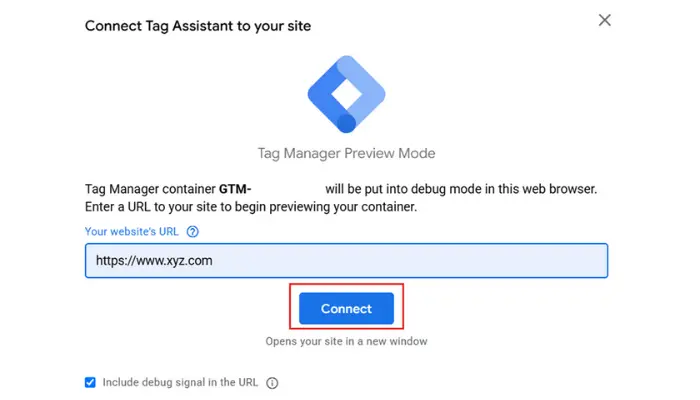
→ This will open a new tab with your store & a GTM debug panel at the bottom, showing which tags are firing.
Method 2: Using a Shopify App
If you prefer a more straightforward method, without editing code, you can use a Shopify app to integrate Google Tag Manager shopify.
If You Don’t Have a GTM Account, Create It Using These Steps:
→ Go to Google Tag Manager and create your GTM account.
→ Add “Account Name” and “Country”.
→ Set up a new container by adding the container name, which is typically the website name.
→ Select “Web” as the target platform and click “Create.”
→ Lastly, accept the terms and services.
Step 1: Install a GTM App
1. Use Google Tag Assistant:
1. Go to the Shopify App Store: Visit the Shopify App Store.
2. Search for GTM: Use the search bar to find apps related to Google Tag Manager.
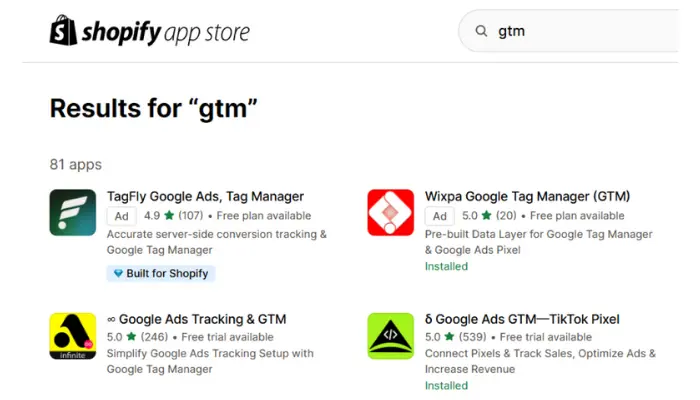
3. Choose an App: Select the app that suits your needs. Click on the app & then click on “Add App”.
4. Install the App: Follow the prompts or steps to install the app on your Shopify store.
Step 2: Configure the App
1. Open the App: After installation, return to your Shopify admin and locate the app in the “Apps” section.
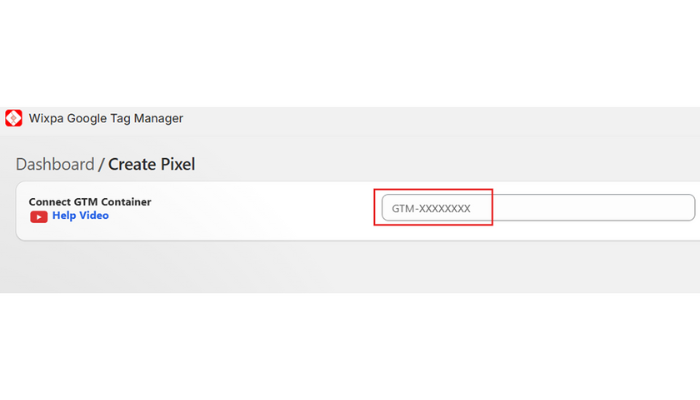
2. Enter Your GTM ID: In the app settings, you will be prompted to enter your GTM ID, which looks like: GTM–XXXXXX. Then save the settings.
Step 3: Verify Your Installation
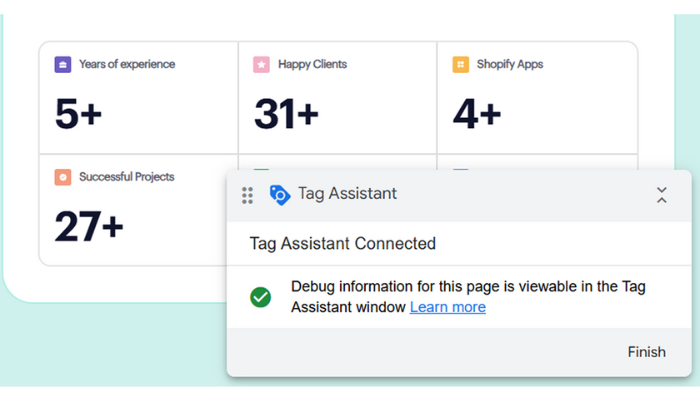
1. Use Google Tag Assistant:
→ Open your Shopify store in a new tab.
→ Click on the Tag Assistant icon in the browser extension and enable it.
→ Refresh your Shopify store page and check if Google Tag Manager (GTM) is firing properly. You should verify that GTM is functioning correctly.
2. Preview Mode in Google Tag Manager:
→ Go to your GTM account.

→ Click on the “Preview” button in the top right corner.

→ Enter your Shopify URL & click on “Connect”.
→ This will open a new tab with your store & a GTM debug panel at the bottom, showing which tags are firing. You can view the real-time data for the tags and triggers you have set up.
Final Steps: Setting Up Tags in Google Tag Manager
Step 1: Create Tags
1. Log in to GTM: Go to your GTM account.
2. Create a New Tag:
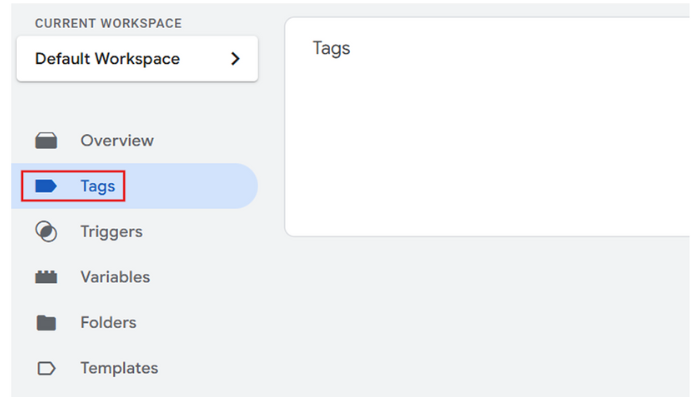
→ Click on “Tags” in the left side bar.
→ Click on the “New” button to create a new tag.
 3. Choose Tag Type: Click on “Tag Configuration” & select the type of tags you want to create (for example, Google Analytics, Facebook Pixels, etc.)
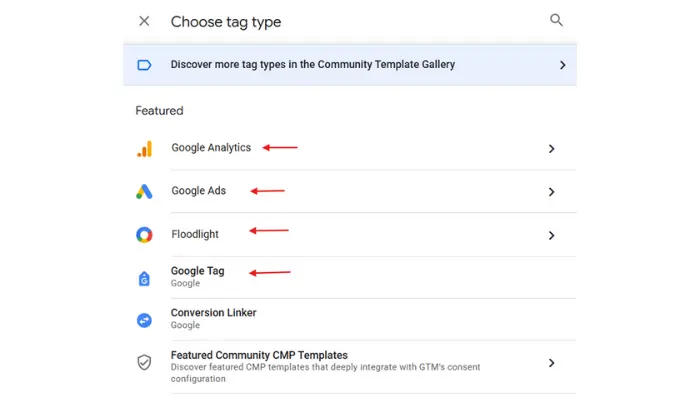
4. Configure Your Tag: Fill in the required fields based on the type of tag you selected. For example, when setting up Google Analytics, you will need to enter your tracking ID.
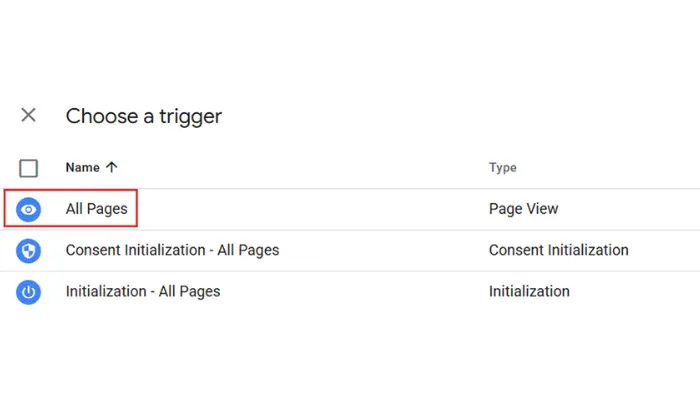
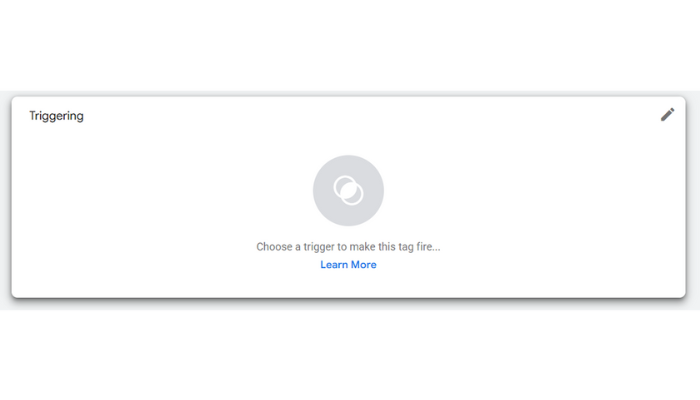 5. Set Up Triggers: Click on “Triggering” to choose when the tag should be fired. You can select existing triggers and create new ones based on specific actions, such as form submission or page views.
6. Save Your Tags: After configuring your tags & triggers, click on the “Save” button.
Step 2: Publish Your Changes
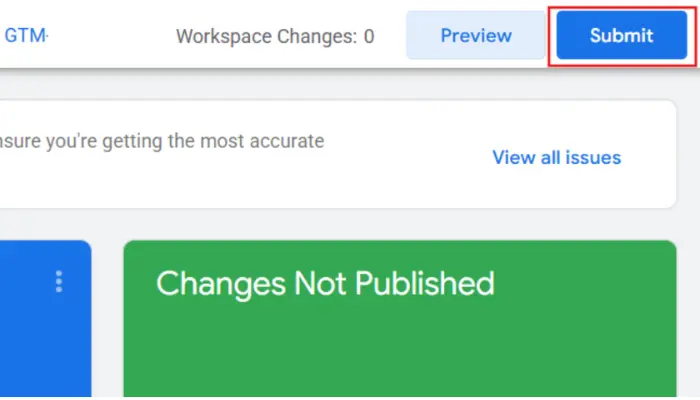
1. Submit Changes: After creating your tags, click on the “Submit” button in the top right corner of the GTM interface. Add a version name and description for your changes, and then click on “Publish”.
2. Test Your Tags: Use the Google Tag Manager (GTM) preview mode to verify that the tags are firing correctly on your Shopify store.
What are the Common Troubleshooting issues in GTM?

Troubleshooting Google Tag Manager (GTM) issues:
Verify GTM Setup: Check GTM configuration and activation on your store. Ensure that the GTM code is correctly placed in the theme. liquid and save the changes.
Check for Ad Blockers: Disable Ad blockers on your page and refresh the store page.
Fix Data Layer Issues: Enable the data layer in the app settings. Verify the manual data layer setup for errors. Use only one source for the GTM setup to avoid conflicts.
Summing Up
Integrating Google Tag Manager in Shopify store can be beneficial for tracking and analyzing user behavior. With this, you can significantly optimize your marketing strategies to enhance growth in your e-commerce business. Whether you choose to implement GTM manually or use the app, by following these detailed steps, you can implement GTM effectively in your Shopify store.


